Let’s create a 4:5 Instagram mosaic. Instead of following manual steps, we will achieve this on the terminal.
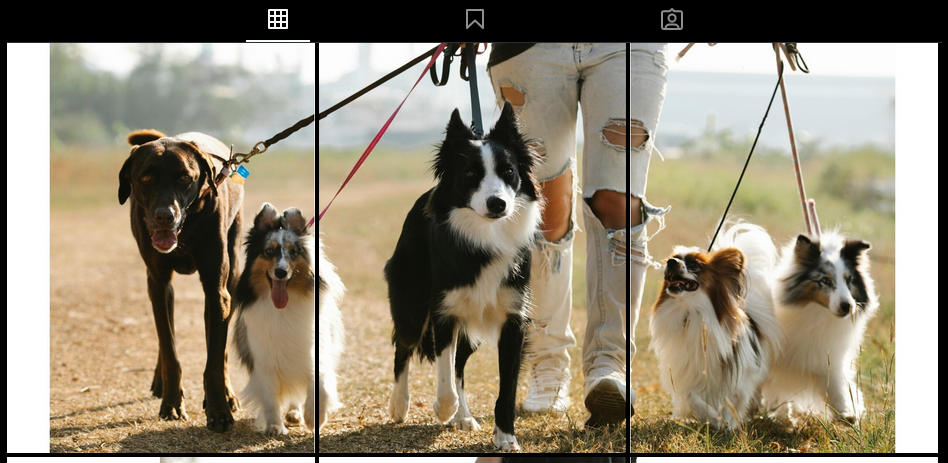
Table of Contents
Steps
- Get the desired image
- Rename it as
img_original.jpg - Open the terminal. Change to the image directory (e.g.
cd ~/Downloads) - Copy the CODE at the end of this post
- Paste it on a script via
$EDITOR create_ig_mosaic.sh(CWDis still~/Downloads), or in your~/.zshrcfile - Make it executable
chmod +x create_ig_mosaic.sh - Run
source ./create_ig_mosaic.sh && create_ig_mosaic
Alternative, no need to rename the file.
create_ig_mosaic "dogs_original.jpg"
And you can also specify more params, read Example usage in the CODE.
- Finally click on
4:5-crop when uploading to Instagram.
Example
- Go to Pexels. Search for
dogsand filter by sizelargeand orientationlandscape: link - Download one, e.g.
- Open a terminal, move where
create_ig_mosaic.shis located and run
chmod +x create_ig_mosaic.sh \
 && source ./create_ig_mosaic.sh \
 && create_ig_mosaic  "$HOME/Downloads/pexels-blue-bird-7210754.jpg"
…which echoes:
Image width:  5040
Image height: 3360
Aspect ratio: 1.500
Aimed ratio: 2.244
Height ratio: 2.488
Width  ratio: 1.663
Image width:  5040
Image height: 3360
/home/<user>/Downloads/tile_0.jpg dims: 1080 1350
/home/<user>/Downloads/tile_1.jpg dims: 1080 1350
/home/<user>/Downloads/tile_2.jpg dims: 1080 1350
- Finally. Upload to Instagram, set
4:5ratio
Actually, before uploading the final images it is a good idea to preview them locally.
To automatically open the result images it’s added to the script the open_imgs_side_by_side function.
It will run automatic, if xdotool is installed, when create_ig_mosaic finishes.
Note, if closed any image preview by accident, then just close them all and run open_imgs_side_by_side "$HOME/Downloads"/tile_*.jpg.
So, if we are not satisfied, we shall repeat previous steps.
In this example the selected image was too tall, or not wide enough.
Anyway, it had a low aspect ratio (width:height = 5040:3360 = 1.5).
The local preview and Instagram results are:
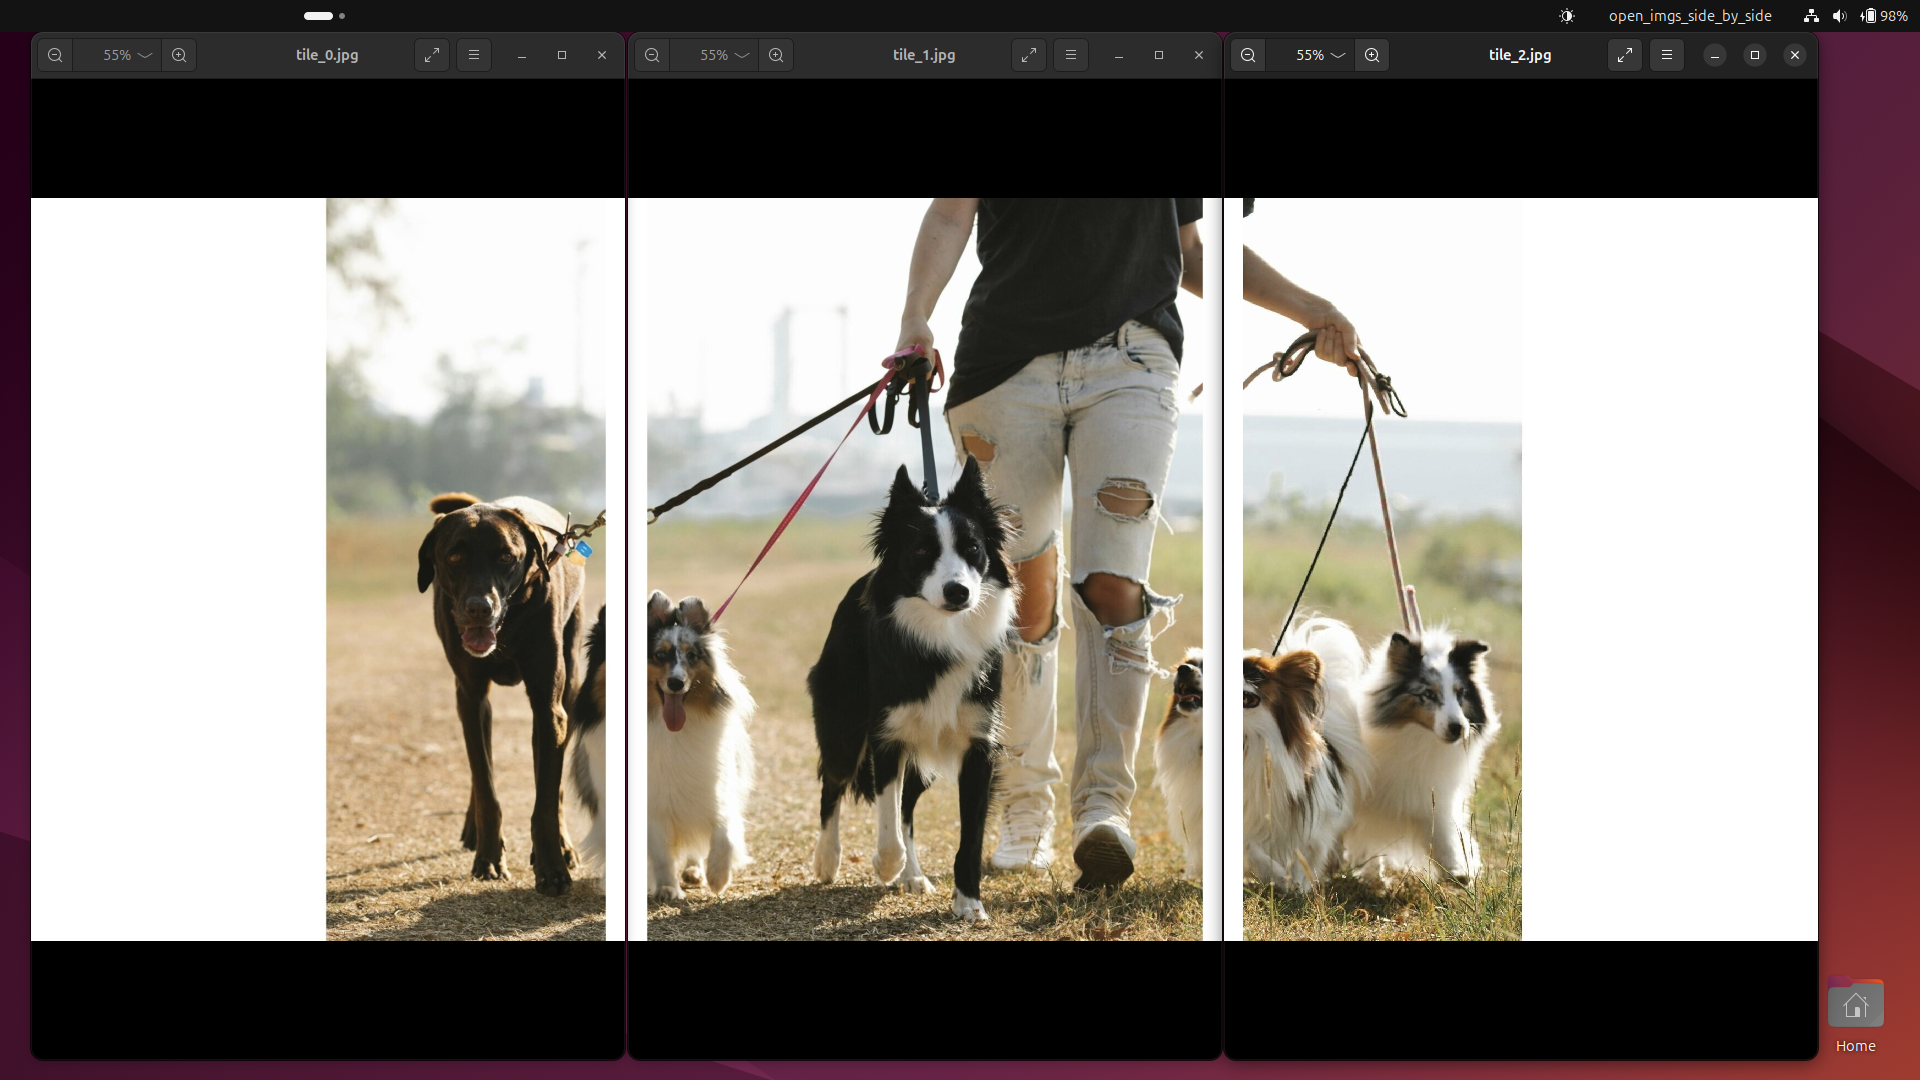 | 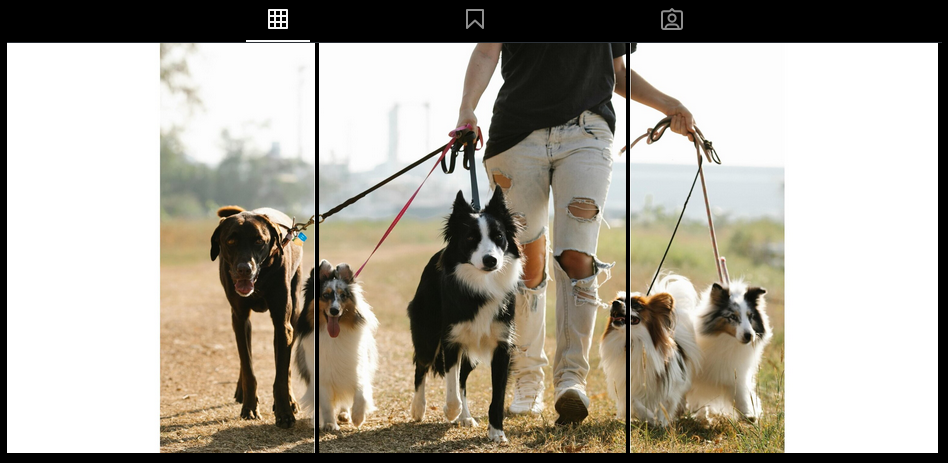 |
To fix this there are some simple approaches:
- Pick another image
- Extend it horizontally with blank space. This is done already by the script. Thus, forget this approach.
- Crop it vertically.
- Ask an AI to extend it horizontally with proper background, i.e. uncrop. Pixelcut is a free tool for this.
- Extend and blur horizontally
I just cropped the image with an image editor (Gimp, Pinta, online,…) to:
Image width:  5040 [not changed]
Image height: 2472
Aspect ratio: 2.038
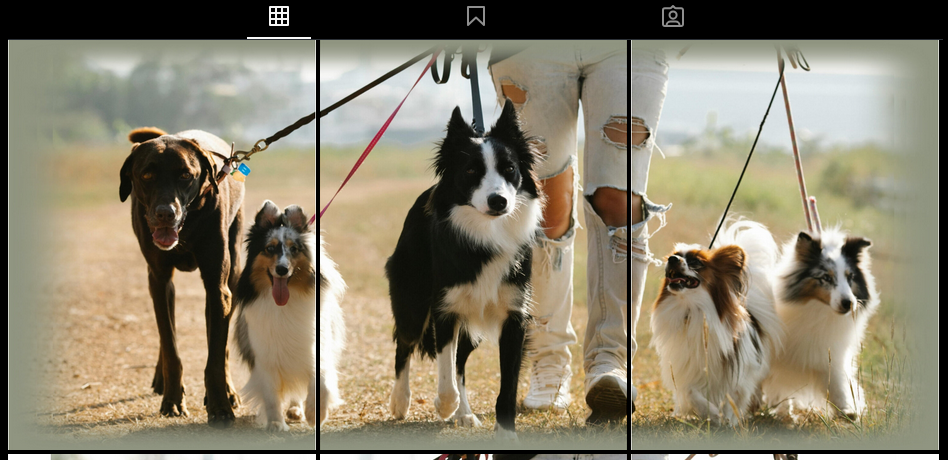
Save it (just overwrite the file). And then run the same command: create_ig_mosaic "$HOME/Downloads/pexels-blue-bird-7210754.jpg"
Next is the result, check it in my Instagram:
Done!
Bonus
Aspect ratio was 2.038 instead of the desired 2.244.
So lets extend and blur horizontally.
The desired pixels are:
- Vertically: unchanged
- Horizontally, apply basic maths:
Since the $height$ is fixed (to 2472), then:
$$ \begin{array}{ll} x & = \dfrac{width_{desired}}{height_{desired}} &* &height\\ & = 2.244 &* &2472\\ & = 5547 \end{array} $$To extend with blank space we just need to:
If the edited file is called
pexels-blue-bird-7210754_cropped-vert.jpg, then, runsource ./create_ig_mosaic.sh && create_ig_mosaic "$HOME/Downloads/pexels-blue-bird-7210754_cropped-vert.jpg"This command will create many images. Just close all and run
get_image_dimensions "$HOME/Downloads/pexels-blue-bird-7210754_cropped-vert_padded.jpg"Which will show5548 2472. Almost the desired resize.Open this croped-vert_padded image with an image editor.
Manually select the close to lateral border pixels and paste them over the blank space. No need to be perfect, cause we are going to blur it. Save it.
Open that image with a blur tool, for example quickpicturetools
Edit the params. The percentage to blur. Pick a background color like something the lateral-borders, a green-ish color in this case (#909581). I used the color picker enhanced explained in my other post.
Save the blurred image to e.g.
blur_edges.jpgRun
create_ig_mosaic "$HOME/Downloads/blur_edges.jpg"
Which outputs next. Notice the original image lost many pixels, but maintened the same aspect ratio. To avoid this get a non-free image editor to blur the lateral pixels, or even better to generate it with AI.
Image width:  2000
Image height: 891
Aspect ratio: 2.244
Aimed ratio: 2.244
Height ratio: .660
Width  ratio: .660
Image width:  2000
Image height: 891
/home/<user>/Downloads/tile_0.jpg dims: 1080 1350
/home/<user>/Downloads/tile_1.jpg dims: 1080 1350
/home/<user>/Downloads/tile_2.jpg dims: 1080 1350
- Upload to Instagram
Re-done!
Code
#!/usr/bin/env zsh

# vim: set ts=2 sts=2 sw=2 expandtab tw=0 :

create_ig_mosaic() {
  # Example usage:
  # Basic usage with default values (processes img_original.jpg)
  # create_ig_mosaic
  #
  # Typical Instagram mosaic creation:
  # - Input: your_photo.jpg
  # - Output: 3 tiles (1010x1350 each with 35px padding)
  # - Quality: 85%
  # - Float preccision: 4
  # - Output directory: ./mosaic_output
  # create_ig_mosaic "your_photo.jpg" 3030 1350 35 3 85 4 "./mosaic_output"

  # Get image
  local image_original=${1:-img_original.jpg}

  # Check if file exists
  if [ ! -f "$image_original" ]; then
    echo "File not found: $image_original"
    return 1
  fi

  # Get final width and height
  local image_final_w=${2:-3030} # 1010 * 3
  local image_final_h=${3:-1350}
  local image_final_w_padd=${4:-35}

  # Number of images (same height)
  local n_imgs=${5:-3}

  # Quality percentage to maintain
  local quality=${6:-85}

  # Float preccision
  local scale=${7:-3}

  # Output directory
  local output_dir=${8:-$(dirname "$image_original")}

  # Get width and height
  get_image_dimensions "$image_original" | { read image_w image_h; }
  echo "Image width:  $image_w"
  echo "Image height: $image_h"

  # Calculate ratios
  local aspect_ratio=$(echo "scale="$scale"; $image_w / $image_h" | bc)
  echo "Aspect ratio: $aspect_ratio"
  local aspect_ratio_desired=$(echo "scale="$scale"; $image_final_w / $image_final_h" | bc)
  echo "Aimed ratio: $aspect_ratio_desired" # 2.24
  local h_ratio=$(echo "scale="$scale"; $image_h / $image_final_h" | bc)
  local w_ratio=$(echo "scale="$scale"; $image_w / $image_final_w" | bc)
  echo "Height ratio: $h_ratio"
  echo "Width  ratio: $w_ratio"

  # If the aspect ratio is smaller than the desired aspect ratio then add horizontal white borders, otherwise add them vertically
  local image_padded="$output_dir"/$(add_suffix_before_ext "$image_original" "_padded")
  local dimensions="${image_w}x${image_h}"
  if [ $(echo "$aspect_ratio < $aspect_ratio_desired" | bc) -eq 1 ]; then
    image_w_new=$(echo "scale="$scale"; $image_final_w * $h_ratio" | bc)
    dimensions="${image_w_new}x${image_h}"
  else
    image_h_new=$(echo "scale="$scale"; $image_final_h * $w_ratio" | bc)
    dimensions="${image_w}x${image_h_new}"
  fi
  convert "$image_original" -background white -gravity center -extent "$dimensions" "$image_padded"

  # Resize
  local image_resized="$output_dir"/$(add_suffix_before_ext "$image_padded" "_resized")
  dimensions="${image_final_w}x${image_final_h}"
  convert "$image_padded" -resize $dimensions -quality $quality "$image_resized"

  # Check width and height
  get_image_dimensions "$image_original" | { read image_w_resized image_h_resized; }
  echo "Image width:  $image_w_resized"
  echo "Image height: $image_h_resized"

  # Divide in $n_imgs of equal height
  local dimension_w=$(echo "scale=0; $image_final_w / $n_imgs" | bc)
  dimensions="${dimension_w}x${image_final_h}"
  convert "$image_resized" -crop "$dimensions" +repage "$output_dir"/tile_%d.jpg

  # Extend each section to 1080x1350 pixels by adding 35 pixels of extra space to both the left and right sides
  (( dimension_w += 2 * image_final_w_padd ))
  dimensions="${dimension_w}x${image_final_h}"
  for file in "$output_dir"/tile_*.jpg; do
    convert "$file" -background white -gravity center -extent "$dimensions" "$file"
    echo -n "$file dims: "
    echo $(get_image_dimensions "$file")
  done

  # Open imgs side-by-side
  local imgs_to_preview=("$output_dir"/tile_*.jpg)
  open_imgs_side_by_side $imgs_to_preview
}

open_imgs_side_by_side() {
  # Accept an array of files as input
  local files=("$@")
  local n_imgs=${#files}  # Use all files by default

  # Optional: Limit to first N images (uncomment if needed)
  # local max_imgs=3
  # (( n_imgs > max_imgs )) && n_imgs=$max_imgs
  # files=("${files[@]:1:$n_imgs}")  # zsh uses 1-based indexing

  # Get screen width
  local SCREEN_WIDTH=$(xwininfo -root | awk '/Width:/ {print $2}')
  local WIDTH=$((SCREEN_WIDTH / n_imgs))
  (( WIDTH *= 1.01 ))  # Small overlap adjustment

  # Array to store PIDs
  local pids=()

  # Process images
  for (( i=1; i<=n_imgs; i++ )); do
    eog "${files[i]}" &
    pids+=($!)

    sleep 0.5  # Wait for window to open

    local X_POS=$(( (i-1) * WIDTH ))  # X position starts at 0
    xdotool search --name "${files[i]##*/}" windowactivate --sync \
      windowsize %@ "$WIDTH" 100% windowmove %@ "$X_POS" 0
  done

  wait $pids[@]
}

get_image_dimensions() {
  local image_file=$1
  local exif_output=$(exiftool "$image_file")
  local width=$(echo "$exif_output" | grep "Image Width" | awk -F': ' '{print $2}')
  local height=$(echo "$exif_output" | grep "Image Height" | awk -F': ' '{print $2}')
  if [ -z "$width" ] || [ -z "$height" ]; then
    return 1
  fi
  echo "$width $height"
}

add_suffix_before_ext() {
  local filename=$1      # full filename, e.g. img_original.jpg
  local suffix=$2        # suffix to add, e.g. _padded

  # Extract basename without extension and extension using zsh modifiers
  local base=${filename:t:r}   # filename without path and extension
  local ext=${filename:e}      # extension without dot

  # Compose new filename with suffix before extension
  if [[ -n $ext ]]; then
    echo "${base}${suffix}.${ext}"
  else
    # If no extension, just add suffix at end
    echo "${base}${suffix}"
  fi
}
Extra: LaTeX in Hugo Scroll
How did I enable $\LaTeX$ for the equations of the Bonus section?
Check my blog $\LaTeX$ and $\text{Ti}\textit{k}\text{Z}$ for web dev .Blogs
J. Marinero - Data Scientist & AI Engineer